IoT Open Basic
Basic course for IoT Open developers and integrators.
Chapter 5
“It would be really nice with some cosy relevant quote here!”
― IoT Open Developer
IoT Open Virtual appliance
If you don't have a Linux machine, now might be a good time to try the IoT Open Virtual Appliance out. It is a virtual machine running Linux, docker and a collection of IoT Open tools. This chapter is not necessary if you have a Linux machine or have access to Grafana and Node-RED somewhere else. It is also possible to rent Node-RED and Grafana instances from IoT Open / TH1NG.
What is the Virtual Appliance
The Virtual Appliance is a virtual linux system in an OVA container. It can be installed in VMWare and in Virtual Box from Oracle. Here we will take you through the latter.
Where to get the appliance
You can get it by downloading this link (big download). Save it somewhere you can find it, since you will need to locate it later.
How to install it
- Start by downloading Virtual Box from https://www.virtualbox.org/. Install it and accept the common installation options. This part should be smooth even though there are quite some things to accept.
- Choose File -> Import Appliance (choose the downloaded file and proceed) or simply open the file you downloaded.
- It present you with the settings for the appliance, those shoud be correct.
- Click on import (the import will take some time).
- When done, click on your new virtual machine to start it.
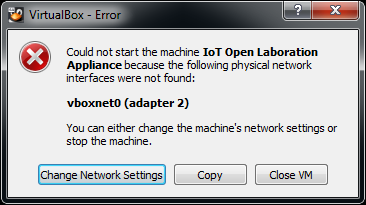
There might be an error coming up depending on your operating system regarding the name interface on Adapter 2. However, this is easy to fix.
Before the appliance boots, you will see an error like:
- Click on
Change Network Settings
You will come directly to the network settings. Choose the tab for Adapter 2.
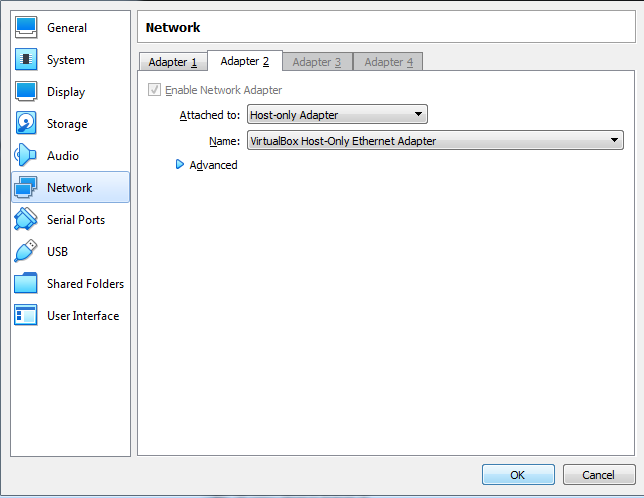
Since the right name now has been chosen, just click OK and the virtual appliance should start.
When stared you will see a black screen with something like:
Debian GNU/Linux 10 iot-open tty1

iot-open login:- Log in with username
iotand the passwordopen.
Note: If your mouse gets captured in the terminal press the key mentioned in the right lower corner, in my case Right Ctrl.
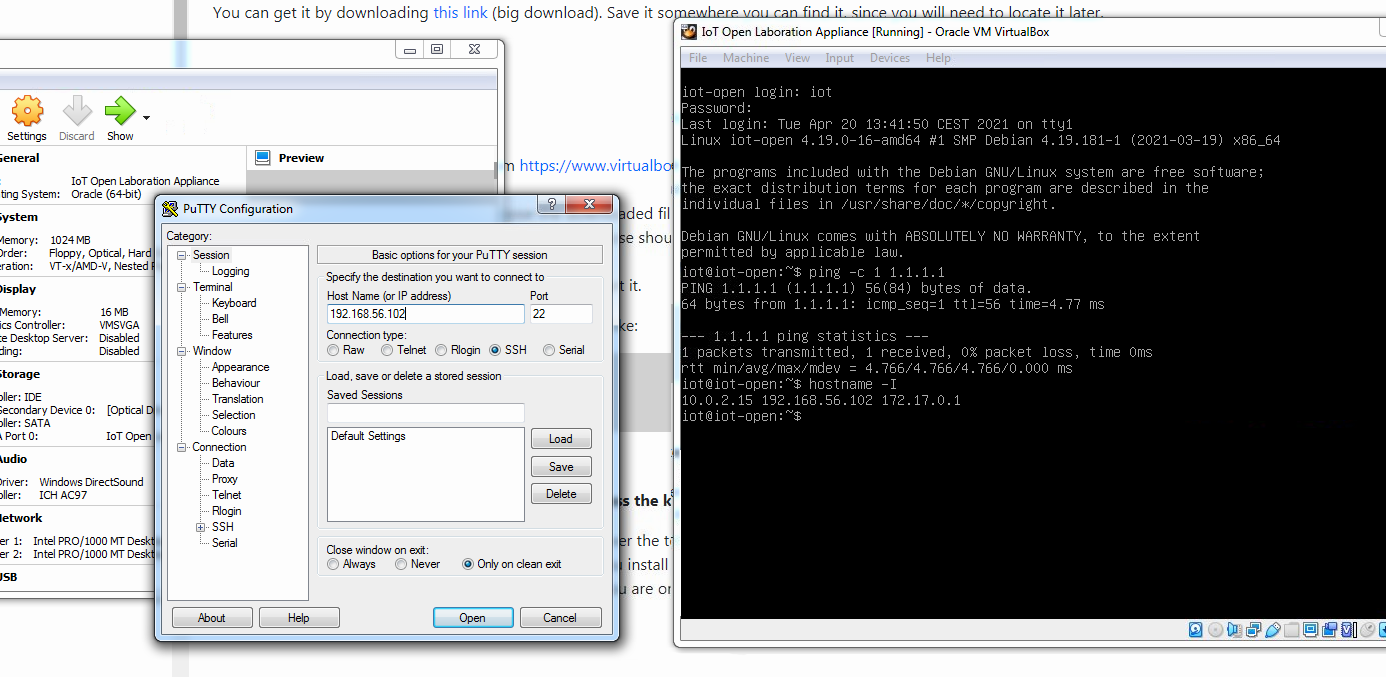
You are now in the console of the virtual machine. However, the terminal in Virtual Box is not great. We recommend that you log in to it with another ssh-client. If you are on Windows we recommend that you install PuTTY instead and use is as a terminal. It's worth the hassle. If you don't have it already, go to this site and download it and install it. If you are on OS X, Linux or Solaris, there should be a ssh-client already installed that works fine.
Verify network access
There are several network interfaces on the machine, if you enter the command hostname -I you will see them. In my
case it looks like this.
iot@iot-open:~$ hostname -I
10.0.2.15 192.168.56.102 172.17.0.1
iot@iot-open:~$
One of the addresses, 192.168.56.102 in my case, is available from the host-machine. Use that one to log in with PuTTY or your preferred ssh client, just remember it for later.
Also you need to verify that the machine has internet access. Try the command ping -c 1 1.1.1.1 and see that you get
0% packet loss.
That's it. Now you should have everything you need to start using the virtual appliance.
If you are scared of the black terminal window, don't worry you will only need it to start applications that have a graphical user interface. Then there are more fun stuff, but not necessary.
Sum up
Below is a picture of a screen after booting the Virtual Appliance. You can see the virtual appliance console to the right an PuTTY to the left. You can see the IP-address in the appliance window and also entered in PuTTY.